Safety Precautions and Guidelines
Always wear eye protection and keep loose clothing tied back; Avoid jewelry that could get caught. Ensure proper support for wide or long workpieces to prevent kickbacks. Keep children away. Grounding is essential for electric safety; use a three-prong plug and proper receptacles. Never operate without the blade guard unless instructed. Follow all safety rules to minimize risks and ensure safe operation.
1.1 General Safety Instructions
Always wear safety glasses and hearing protection when operating the table saw. Avoid loose clothing or jewelry that could get caught in moving parts. Keep hands and fingers away from the blade at all times. Use push sticks or other devices for safe material handling. Ensure the work area is clear of clutter and flammable materials. Maintain proper ventilation to prevent dust and fume accumulation. Never overreach or stretch while operating the saw. Keep children and pets away from the work area. Always use the correct blade type for your material. Stay alert and avoid distractions while operating the saw. Follow all instructions provided in this manual and by the manufacturer.
1.2 Specific Safety Precautions to Prevent Kickbacks
To prevent kickbacks, ensure proper blade alignment with the miter gauge groove. Always use a splitter or riving knife when ripping lumber. Keep the workpiece flat on the table and against the fence. Avoid using dull or damaged blades, as they increase kickback risk. Maintain a firm grip on materials and use push sticks for small or narrow pieces. Never cut curved or warped stock without proper support. Keep the work area clean to avoid distractions. Stand slightly to the side of the blade path and keep hands away from the blade’s trajectory at all times.
1.3 Grounding Instructions for Electric Safety
Ensure the Craftsman table saw is properly grounded to prevent electric shock. Use a three-pronged power cord and plug, and connect it to a grounded outlet with a 20-amp circuit. Never alter or remove the grounding prong. If the cord is damaged, replace it immediately. Use a ground fault circuit interrupter (GFCI) outlet for added safety. Regularly inspect all electrical components for wear or damage. Grounding ensures safe operation by directing electrical currents away from the user, reducing shock hazards.

Product Specifications
The Craftsman table saw features a powerful 1.75 HP motor, 10-inch blade capacity, and a durable cast-iron table. It includes a 5/8-inch arbor and 30-inch rip capacity.
2.1 Technical Details of the Craftsman Table Saw
The Craftsman table saw is equipped with a 1.75 HP induction motor, delivering reliable power for cutting through various materials. It features a 10-inch blade capacity and a 5/8-inch arbor size, ensuring compatibility with standard blades. The saw operates at 120V, 60Hz, and 4500 RPM, providing smooth performance. Its cast-iron table measures 20×27 inches, offering a stable work surface. The rip capacity is 30 inches to the right and 12 inches to the left, accommodating large workpieces. The saw also includes a miter gauge with adjustable positive stops for precise angle cuts.
2.2 Key Features and Components
The Craftsman table saw includes a robust rip fence for precise straight cuts, a miter gauge for accurate angle adjustments, and a blade guard to enhance safety. It also features a dust collection port to minimize debris and a storage compartment for accessories. The saw has adjustable legs for leveling on uneven surfaces and an emergency stop button for quick shutdowns. Additional components include a T-slot miter channel and compatibility with various table saw accessories for expanded functionality.

Assembly and Installation
Begin by unpacking and inventorying all parts. Attach the leg set to the saw base, ensuring proper alignment. Secure the saw to a sturdy work surface for stability. Follow the manual for precise alignment and tightening of bolts to prevent vibrations during operation.
3.1 Unpacking and Inventory of Parts
Begin by carefully unpacking the table saw and all accessories from the shipping container. Inspect for any visible damage during transit. Compare the contents with the provided parts list to ensure all items are included. This step is crucial for a successful assembly. Place all small parts, such as screws and bolts, in a safe container to prevent loss. Verify that the saw, stand, and accessories match the model specified in the manual. If any parts are missing or damaged, contact customer support immediately before proceeding.
3.2 Attaching the Leg Set to the Saw
Position the leg set near the table saw and align the attachment points with the saw’s base. Use the provided bolts and washers to secure the legs, ensuring they are tightly fastened. Tighten the bolts in a star pattern for even clamping force. Double-check the alignment to ensure the saw remains level and stable. Use a socket wrench for proper torque. Once attached, verify the legs are firmly in place and the saw is balanced. This step ensures the table saw operates safely and efficiently during use.
3.3 Mounting the Saw to Other Surfaces
Mount the table saw to a sturdy workbench or stand using the provided bolts and washers. Ensure the surface is level and can support the saw’s weight. Align the mounting holes on the saw’s base with those on the surface. Tighten the bolts evenly to secure the saw firmly. Avoid over-tightening to prevent damage to the table top. Once mounted, check the alignment and stability to ensure safe and accurate cutting operations. Proper mounting enhances the saw’s performance and reduces vibration during use.
Adjustments and Alignments
Ensure accurate cuts by aligning the arbor parallel to the rip fence. Adjust the trunnion to maintain blade perpendicularity. Regular checks prevent drift and improve performance.
4.1 Blade Alignment with the Miter Gauge Groove
The blade must align perfectly with the miter gauge groove for precise cuts. Use a combination square to ensure the arbor is parallel to the groove. Loosen the arbor mounting bolts, adjust the blade position, and retighten the bolts. Verify alignment by passing a miter bar through the groove; it should move smoothly without binding. Proper alignment ensures accurate cuts and prevents safety hazards. Refer to the exploded diagram for arbor and miter gauge locations. Regular checks maintain optimal performance and reduce wear on components.
4.2 Rip Fence Adjustment
Proper rip fence alignment is critical for accurate straight cuts. Ensure the fence is parallel to the saw blade by measuring the distance between the fence and blade at both ends. Loosen the locking mechanism and adjust the fence until it aligns perfectly. Tighten the lock securely after adjustment. Periodically check the fence alignment to maintain precision. Misalignment can lead to uneven cuts or binding. Always refer to the exploded diagram for fence adjustment components. Regular adjustment ensures consistent performance and prevents wear on the fence system.
4.3 Miter Gauge Calibration
Calibrate the miter gauge to ensure accurate angled cuts. Start by setting the gauge to 0° and aligning it with the blade using a combination square or precision square. If misaligned, loosen the mounting screws and adjust the gauge until it matches the blade’s edge. Tighten the screws firmly and recheck the alignment. Repeat the process for 45° and 90° positions. Regular calibration prevents cutting errors and ensures precise miter joints. Always verify alignment after adjusting or moving the gauge to maintain accuracy in crosscutting operations.
4.4 Setting the 90° and 45° Positive Stops
To set the 90° and 45° positive stops, locate the stop brackets on the miter gauge. For 90°, align the gauge with the blade using a square, then tighten the stop bracket to hold this position. Repeat for 45° by tilting the gauge and aligning it with the blade’s edge. Ensure both stops are secure and test their accuracy by making sample cuts. Regularly check and adjust the stops to maintain precise mitering accuracy. Properly set stops ensure consistent and repeatable angled cuts, enhancing overall cutting performance and safety.

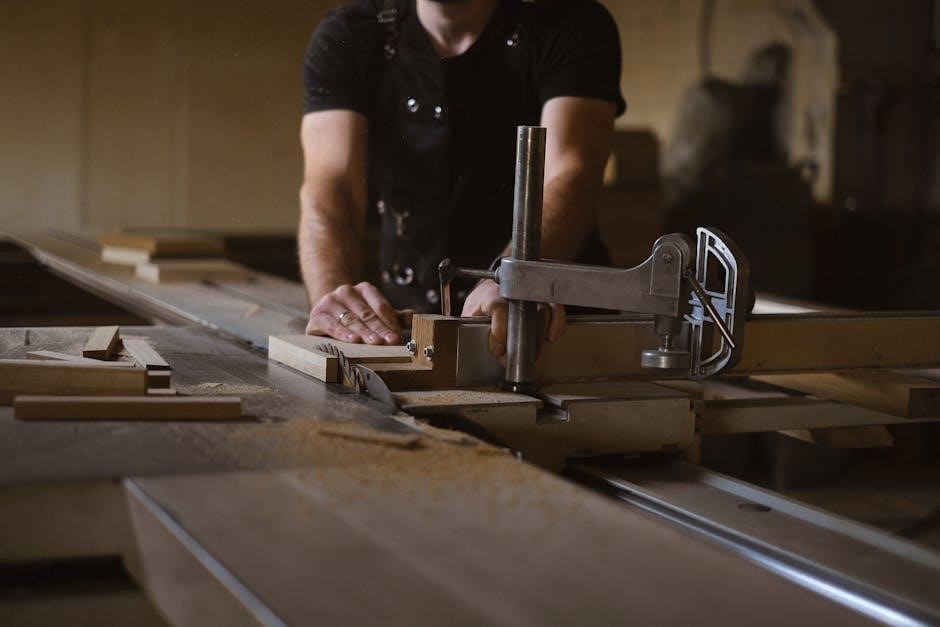
Operating the Table Saw
Always wear safety glasses and a dust mask. Ensure loose clothing is tied back. Start the saw, check blade alignment, and verify material is properly positioned. Keep hands away from the blade during operation. Maintain steady control and avoid overloading the motor. Ensure the workpiece is flat on the table and aligned with the fence or miter gauge for accurate cuts; Follow the material through the blade and never reach across the saw while it’s running.
5.1 Basic Saw Operations
Ensure the saw is on a stable, level surface. Turn it on and let the blade reach full speed before cutting. Position the material firmly against the fence or miter gauge. Keep hands at least 6 inches from the blade and maintain control throughout the cut. Avoid distractions or looking away while operating. Use steady, consistent pressure to guide the material through the blade. Never force the material, as this can cause kickback or loss of control. Always keep loose clothing and long hair tied back for safety.
5.2 Ripping Operations
For ripping, align the material with the rip fence, ensuring it is parallel to the blade. Secure the fence at the desired width using the locking mechanism. Always use a push stick or other hold-down device to maintain control and prevent kickback. Keep hands away from the blade and avoid overloading the saw. Make steady, consistent passes, applying even pressure. Never rip material that is warped or loose, as this can cause unsafe conditions. Always follow safety guidelines and use proper techniques to achieve accurate, clean cuts.
5.3 Crosscutting Operations

For crosscutting, use the miter gauge or a crosscut sled for precise cuts. Align the material’s end with the blade, ensuring it is flat and secure. Clamp the workpiece firmly to prevent movement. Set the blade angle if angled cuts are needed. Keep hands clear of the blade and use a push stick for control. Make steady, smooth passes without applying excessive pressure. Avoid cutting warped or loose material, as it may cause kickback. Always follow safety guidelines and maintain proper control for accurate crosscuts.
5.4 Mitering Operations
For mitering, set the desired angle using the miter gauge or a combination square. Secure the workpiece firmly to the gauge, ensuring it aligns with the blade. Use a push stick for added control and safety. Feed the material smoothly through the blade at the set angle. Maintain steady pressure to prevent shifting. Avoid loose clothing or long jewelry near the blade. Always keep your hands clear and use proper safety equipment; Accurate mitering requires precise alignment and consistent pressure for clean, professional results.

Maintenance and Care
Regularly clean the table and blade to prevent dust buildup. Lubricate moving parts and check for wear. Store the saw in a dry, secure location. Always follow manufacturer guidelines for optimal performance and longevity.
6.1 General Maintenance Tips
Regular maintenance ensures optimal performance and longevity of your Craftsman table saw. Clean the table and blade frequently to remove dust and debris. Check alignment and blade sharpness regularly. Tighten all bolts and screws to maintain stability; Lubricate moving parts, such as the fence and miter gauge, to reduce friction. Store the saw in a dry, secure location to prevent rust and damage. Always unplug the saw before performing maintenance tasks. Follow manufacturer recommendations for lubricants and cleaning products to avoid damaging components.
6.2 Blade Maintenance and Replacement
Proper blade maintenance ensures precise cuts and prolongs tool life. Inspect the blade regularly for dullness, damage, or debris buildup. Clean the blade with a solvent-safe cleaner to remove resin and dust. Avoid using abrasive materials that may damage the coating. For replacement, disconnect power and use the provided wrench to loosen the arbor nut. Install the new blade with the correct orientation and tighten securely. Always follow manufacturer guidelines for blade compatibility and torque specifications. Regular blade maintenance enhances performance and safety during operations.
6.3 Dust Management and Cleanup
Regular dust management is essential for maintaining your Craftsman table saw’s performance and safety. Use a dust collection system or vacuum to minimize airborne particles during operation. After each use, turn off the power and clean the saw, focusing on the table surface, miter gauge slots, and blade area. Use a soft brush or compressed air to remove dust and debris. For tougher buildup, dampen a cloth with water, but ensure all surfaces dry thoroughly to prevent rust. Regular cleanup prevents dust accumulation and ensures precise cuts and smooth operation over time.

Troubleshooting Common Issues
This section helps users identify and resolve common issues with their Craftsman table saw, ensuring optimal performance and safety. Address blade or motor problems to maintain functionality.
7.1 Common Symptoms and Possible Causes
Identify common issues with your Craftsman table saw, such as uneven cuts, motor overheating, or excessive vibration. Uneven cuts may result from a dull blade or misalignment. Motor overheating could stem from dust buildup or a malfunctioning thermal overload. Excessive vibration might indicate an unbalanced blade or loose components. Addressing these symptoms promptly ensures optimal performance and safety. Always refer to the troubleshooting guide for detailed diagnostic steps and solutions to maintain your tool’s efficiency and longevity.
7.2 Corrective Actions and Solutions
To address common issues with your Craftsman table saw, start by identifying the root cause. For uneven cuts, sharpen or replace the blade and ensure proper alignment. If the motor overheats, clean dust from vents and allow it to cool. Excessive vibration can be resolved by balancing the blade or tightening loose parts. For blade malfunctions, check the arbor nut and ensure proper installation. Regularly inspect and maintain components like belts and bearings to prevent downtime. Always follow the manufacturer’s guidance for repairs and adjustments to ensure safety and optimal performance.

Parts List and Diagram
This section provides a detailed list of all parts for model 137.221960, including hardware and accessories, along with an exploded diagram for easy identification and assembly guidance.
8.1 Detailed Parts List for Model 137.221960
The detailed parts list for model 137.221960 includes all components, such as the saw blade, motor assembly, rip fence, miter gauge, and hardware. It specifies part numbers, descriptions, and quantities. This list helps users identify and order replacement parts. Essential items like screws, belts, and bearings are also included. Accessories such as the push stick, wrench, and throat plates are listed. The list is categorized for easy reference, ensuring users can locate and verify each part. Cross-referencing with the exploded diagram aids in understanding assembly and disassembly. Always refer to this list for accurate part identification and ordering.
8.2 Exploded Diagram of the Table Saw
The exploded diagram provides a detailed visual representation of the table saw’s components in a disassembled state. It illustrates the relationship between parts, such as the motor, blade, rip fence, and frame. This diagram is essential for understanding assembly, disassembly, and part identification. Key components are labeled with corresponding numbers, matching the parts list. The diagram helps users visualize how parts interact and aids in troubleshooting or repairing the saw. It is a critical reference for maintaining and servicing the table saw effectively.

Warranty Information
The Craftsman table saw is backed by a limited warranty covering defects in materials and workmanship for a specified period. Proper use and maintenance are required.
9.1 Coverage and Duration
The Craftsman table saw is covered by a limited warranty for a period of two (2) years from the date of purchase. This warranty applies to defects in materials and workmanship under normal household or commercial use. The saw and its electric motor are included in this coverage. Repairs or replacements will be made free of charge during this period. The warranty is valid only for the original purchaser and requires proper use and maintenance of the product as outlined in the instruction manual.
9.2 Exclusions and Conditions
The warranty does not cover damage resulting from misuse, accidents, or neglect. It excludes issues caused by improper maintenance or normal wear and tear. Modifications or alterations to the saw void the warranty. Coverage is limited to the original purchaser, and proof of purchase is required. Damage from overload, incorrect voltage, or use of unauthorized parts is not covered. The warranty is void if the product is used for commercial purposes beyond its intended design. Proper registration and adherence to manual instructions are essential for warranty validity.